

How to Plan Your First Home Haunt Floor Plan
Every great home haunt starts the same way: not with a fog machine or a killer animatronic, but with a plan. The floor plan is the skeleton of your haunt. It decides where your scares land, how your guests move, and whether the whole thing feels like a guided nightmare or a confusing pile of props in a garage.
If this is your first year building a walk-through haunt, this guide will walk you through how to lay it out before you spend a dollar on decor.
 Start with the space you actually have
Before you dream up a 12-room haunted asylum, measure what you’re working with. Most first-time home haunts live in one of a few spaces:
- A garage (single or double)
- A basement
- A backyard or side yard
- A driveway and front porch combo
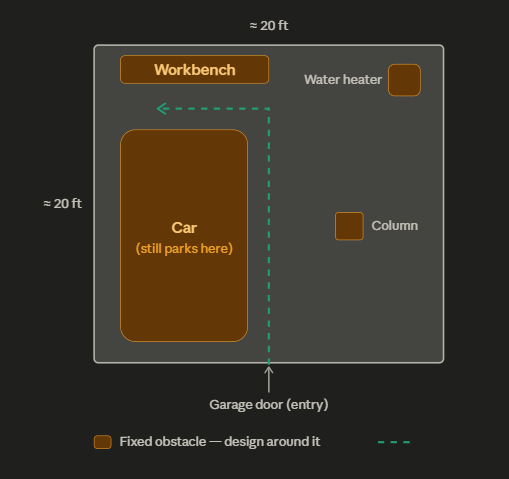
Grab a tape measure and sketch the real dimensions on paper or in a free tool like Google Drawings. Mark the fixed stuff you can’t move: support columns, the water heater, garden beds, the car you still need to park somewhere. Those become your walls and obstacles whether you like it or not, so design around them instead of fighting them.
A common rookie mistake is planning for the space you wish you had. Plan for the space you’ve got, and it’ll come together far faster.
Decide on a single path
The most important rule of a walk-through haunt: guests should never wonder where to go. A confused guest is a guest who isn’t scared. They’re too busy looking for the exit.
Lay out one clear path from entrance to exit. The classic shapes are:
- Straight shot — simplest, works in narrow spaces like a single-car garage. Guests enter one end and leave the other.
- U-shape or switchback — folds the path back on itself to fit more “rooms” into a small footprint. Great for garages and basements.
- Loop — enter and exit near the same point, good for backyards where you want guests to return to where they started.
Use a continuous physical barrier — black plastic sheeting, fabric, pallets, or temporary walls — to force the path. If guests can see the exit or wander off-route, the illusion breaks.
Think in “scenes,” not “decorations.”
Once you have a path, divide it into scenes. A scene is a short, themed moment: a graveyard, a butcher room, a clown hallway, an infected lab. Each scene should have one clear idea and one main scare.
For a first haunt, aim for three to five scenes. That’s enough to feel like a journey without overwhelming you with build work. A double garage typically fits three or four; a backyard path can hold more.
Sketch each scene as a box along your path and give it a working name. You’re not decorating yet — you’re just claiming territory. This is also where you’ll spot pacing problems early.
Plan your scare pacing
Good haunts breathe. If every scene is a max-volume jump scare, guests go numb and the scares stop working. Build a rhythm instead:
- Build-up — an eerie, slower scene that sets the mood (dim graveyard, fog, distant sound).
- Payoff — the big scare (an actor pop-out, a drop panel, a startling animatronic).
- Recovery — a beat to breathe before the next build-up.
Mark on your floor plan where the big scares happen. Spread them out. A jump scare hits harder when guests have just relaxed.
Map your scares and sightlines
For each scare, think about three things:
- Concealment — where does the actor or prop hide? You need a hidden pocket, a corner, or a black-curtain alcove.
- Trigger point — where does the guest need to be for the scare to land? Mark it.
- Sightline — what can guests see from each point? Don’t let them spot the next scare (or the hiding actor) too early. Use turns, curtains, and darkness to control what’s visible.
A scare that’s visible from 15 feet away isn’t a scare. Block the sightline and let it surprise.
Don’t forget flow and safety
A home haunt has to move people through safely in the dark. Build these into your floor plan from the start:
- Path width: Keep walkways at least 3 feet wide so guests don’t bottleneck or trip.
- Headroom and hazards: Mark low beams, steps, hoses, and cords. Tape down or cover anything someone could catch a foot on.
- Emergency exit: Always have a clear, non-main-path route out in case someone panics or needs to leave quickly.
- Actor access: Plan hidden paths so that scare actors can reach their spots and reset without walking through the guest path.
- Lighting transitions: Note where it goes from light to dark so guests’ eyes have a second to adjust at the entrance.
Build a simple legend
Finish your floor plan with a quick legend so the whole thing is readable at a glance. Use simple symbols for:
- Walls and barriers
- Entrance and exit
- Each scene (numbered)
- Scare points (a star or X)
- Actor hiding spots
- Fog, lighting, and sound placement
This single sheet becomes your build checklist, your shopping list, and your setup-day guide all at once.
Your floor plan checklist
Before you start building, your plan should answer all of these:
- [ ] Real measured dimensions of the space
- [ ] Fixed obstacles marked
- [ ] One clear entrance-to-exit path
- [ ] Three to five named scenes
- [ ] Big scares spaced out for pacing
- [ ] Hiding spots and trigger points mapped
- [ ] Walkways at least 3 feet wide
- [ ] A separate emergency exit
- [ ] Hidden actor access routes
- [ ] Fog, light, and sound positions noted
Nail the floor plan and everything after it — the walls, the lighting, the props — gets easier, because you’ll know exactly what each scene needs. Once your layout is locked, the next step is building the walls that turn those boxes on paper into real, claustrophobic rooms.