

Once you’ve got a floor plan, the next job is turning those boxes on paper into real, claustrophobic rooms. Walls are what separate a pile of props from an actual walk-through haunt. They block sightlines, force the path, hide your scare actors, and give guests that closed-in feeling that makes the scares land.
The good news: you don’t need lumber, drywall, or a contractor. A PVC pipe frame wrapped in plastic sheeting is the go-to method for home haunters because it’s cheap, lightweight, reusable, and quick to put up and take down. Here’s how to build it.
Why PVC and plastic
PVC and plastic sheeting have become the standard for home haunts for a few reasons:
- Lightweight — a full wall panel is easy for one person to move and reposition.
- Cheap — PVC pipe and plastic sheeting cost a fraction as much as framed walls.
- Reusable — frames break down into pipe and fittings, you can store flat and rebuild next year.
- Fast — no sawing or screwing; frames push together by hand.
- Renter-friendly — nothing gets nailed into your garage or walls.
The trade-off is that PVC walls aren’t load-bearing and can be tippy if you don’t anchor them. We’ll cover how to keep them stable.
What you’ll need
For a basic wall panel, gather:
- 1/2-inch or 3/4-inch PVC pipe — 3/4-inch is sturdier and worth it for taller walls.
- PVC fittings — 3-way elbows for corners, tees for mid-span connections, and 4-way fittings if walls will branch.
- Black plastic sheeting — 4- or 6-mil is ideal. 6 mil is more durable and more opaque, which matters for blocking light.
- Zip ties or binder clips — to attach the plastic to the frame.
- A pipe cutter or hacksaw — PVC cuts easily.
- Weights or stakes — sandbags, water jugs, or buckets for indoor stability; tent stakes for outdoor.
A roll of gaffer tape and a marker round out the kit.
Step 1: Build the frame
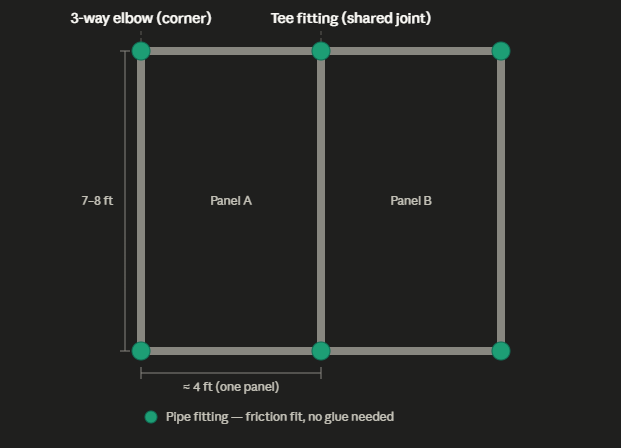
Think of each wall as a simple rectangle of pipe. A standard panel is about 4 feet wide and 7 to 8 feet tall — tall enough that guests can’t see over it.
- Cut two vertical pipes for the sides (your wall height).
- Cut two horizontal pipes for the top and bottom (your wall width).
- Connect them with 3-way elbow fittings at the four corners.
You don’t need to glue the fittings. A friction fit holds fine and lets you take everything apart for storage. Only glue the joints you never plan to separate.
For walls longer than one panel, join panels side by side using tee fittings, sharing a vertical pipe between them. This is how you build a continuous corridor.
Step 2: Add stability
This is the step new haunters skip — and regret. A tall PVC rectangle tips easily, especially when a startled guest bumps it.
Add stability with:
- Feet: Add a short horizontal pipe and two tee fittings at the base of each vertical, forming a small T-foot that widens the footprint. This alone makes a huge difference.
- Weights: Set sandbags, filled buckets, or water jugs on the bottom pipe or against the feet.
- Connecting the run: A long line of connected panels braces itself. Straight single panels are the wobbliest, so build in corners and turns where you can — they’re self-bracing.
- Anchoring to the structure: In a garage, you can zip-tie the top corners loosely to shelving or hooks for extra security (just don’t make it load-bearing on anything fragile).
Step 3: Skin the walls with plastic
With the frame standing, wrap it in black plastic sheeting:
- Drape the plastic over the frame, leaving a few inches of overlap on all sides.
- Attach it with zip ties through small holes punched near the frame, or use binder clips for a no-holes option.
- Pull it taut as you go so it doesn’t sag or billow.
- Overlap sheets by several inches where panels meet, and tape the seams so no light leaks through.
For a continuous corridor, run the plastic across multiple frames in one pass where possible. Fewer seams means fewer light leaks and a cleaner look.
Step 4: Kill the light leaks
Light is the enemy of a good haunt. Even a thin gap of light ruins the mood and reveals what’s behind the wall. Walk your corridor in the dark before opening and look for:
- Gaps where panels meet
- Light bleeding under the bottom edge
- Pinholes in the plastic
Patch them with gaffer tape, overlap more plastic, or drop a strip of fabric along the floor line. 6 mil black plastic blocks far more light than 4 mil, which is why it’s worth the small upgrade for any wall guests get close to.
Finishing touches
Bare black plastic already reads as “dark hallway,” but a few touches sell it:
- Texture: Drape cheesecloth, fabric, or torn curtains over sections for a decayed look.
- Depth: Hang tattered plastic strips at a doorway as a pass-through curtain that hides what’s next.
- Theme: A graveyard scene gets different dressing than a butcher room. Let your floor plan’s scenes guide what each wall stretch becomes.
- Actor pockets: Leave a hidden gap or a slit in the plastic where a scare actor can hide and pop out.
Safety reminders
Because guests move through these walls in the dark, build safety in:
- Keep all plastic and fabric away from heat sources — no lights, fog machines, or heaters touching the sheeting. Use LED lighting, which runs cool.
- Make sure walls can’t fall on anyone — anchor and weight every panel.
- Keep the path clear of trip hazards along the bottom pipe; tape down or cover any low rails.
- Maintain a clear emergency exit that doesn’t depend on the main path.
Quick build checklist
- PVC frames cut and fitted (4 ft × 7–8 ft panels)
- T-feet added to every vertical
- Panels connected into runs with corners for bracing
- Weights or stakes in place
- Black 6 mil plastic skinned and pulled taut
- Seams overlapped and taped
- Light leaks checked in the dark and patched
- All plastic clear of heat sources
- Emergency exit kept clear
Build your walls right and the whole haunt transforms — suddenly you have rooms, corridors, and hiding spots instead of an open garage. With the structure up, the next thing that brings it to life is light. Done well, lighting turns a plain plastic corridor into a place guests are genuinely afraid to walk through.