

Haunt Lighting Color Theory: How to Light a Scare
You can build perfect walls and stock the best props money can buy, but if your haunt is lit like a garage, it’ll feel like one. Lighting is the single biggest lever you have over mood. The right color in the right spot turns a plastic corridor into a place guests are genuinely afraid to walk through — and it costs far less than another animatronic.
This guide breaks down how color, direction, and darkness work together so you can light your haunt like a horror film instead of a hardware store.
Darkness is your most important tool
Before we talk about color, talk about the absence of it. Horror lives in what guests can’t see. A fully lit room gives away every prop, every actor, and every corner. A mostly dark room with one pool of eerie light forces the imagination to fill the gaps — and the imagination is always scarier than your budget.
The goal isn’t to light the whole space. It’s to light specific moments and let everything else fall into shadow. Think spotlights, not floodlights. Reveal the scare; hide the rest.
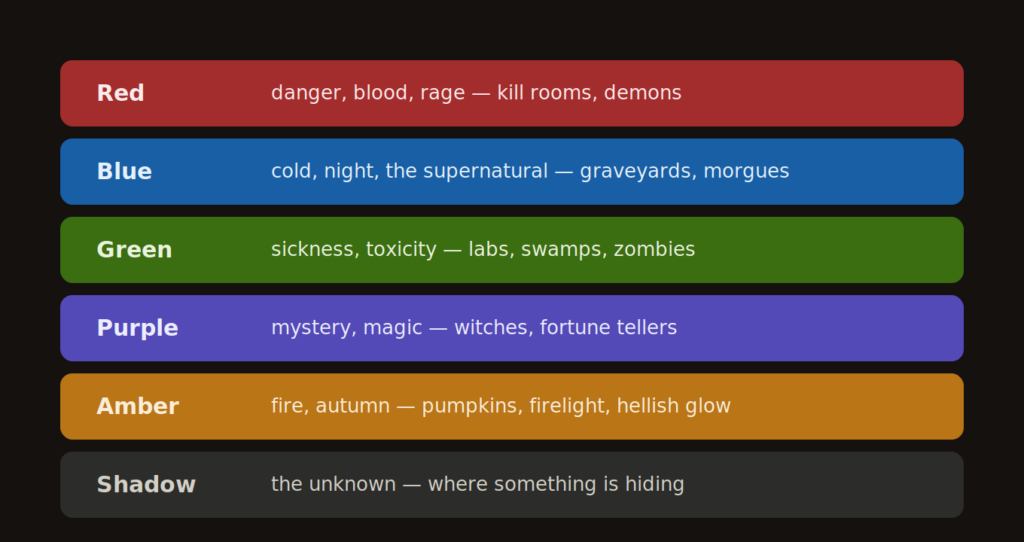
What each color says
Color carries emotion before a guest consciously registers it. Here’s how the haunt palette reads:
Red — danger, blood, rage, alarm. The most aggressive color in the kit. Use it for kill rooms, demonic scenes, and high-intensity moments. A little goes a long way; a room drowned in red goes numb fast.
Blue — cold, night, death, the supernatural. Deep blue reads as moonlight and dread. It’s the workhorse of “eerie” and pairs well with fog. Great for graveyards, morgues, and ghostly scenes.
Green — sickness, toxicity, the unnatural. Green light makes skin look wrong and rooms feel contaminated. Perfect for labs, swamps, zombie scenes, and anything radioactive or diseased.
Purple — mystery, magic, the otherworldly. Sits between menace and wonder. Use it for witch scenes, fortune tellers, and supernatural spaces that aren’t outright violent.
Amber/orange — fire, warmth, autumn, the jack-o’-lantern glow. Warmer and less threatening on its own, but excellent for firelight effects, pumpkin scenes, and a flickering hellish glow.
No color (deep shadow) — the unknown. Sometimes the scariest “light” is a black void where a guest knows something is hiding.
Direction changes everything
The same light in the same color reads completely differently depending on where it comes from. Direction is half of lighting design.
Uplighting — light placed low, pointing up at a face or prop. This is the classic horror trick. We almost never see faces lit from below, so it instantly reads as wrong and unsettling. Put an uplight under a mask, a portrait, or an actor’s face for maximum creep.
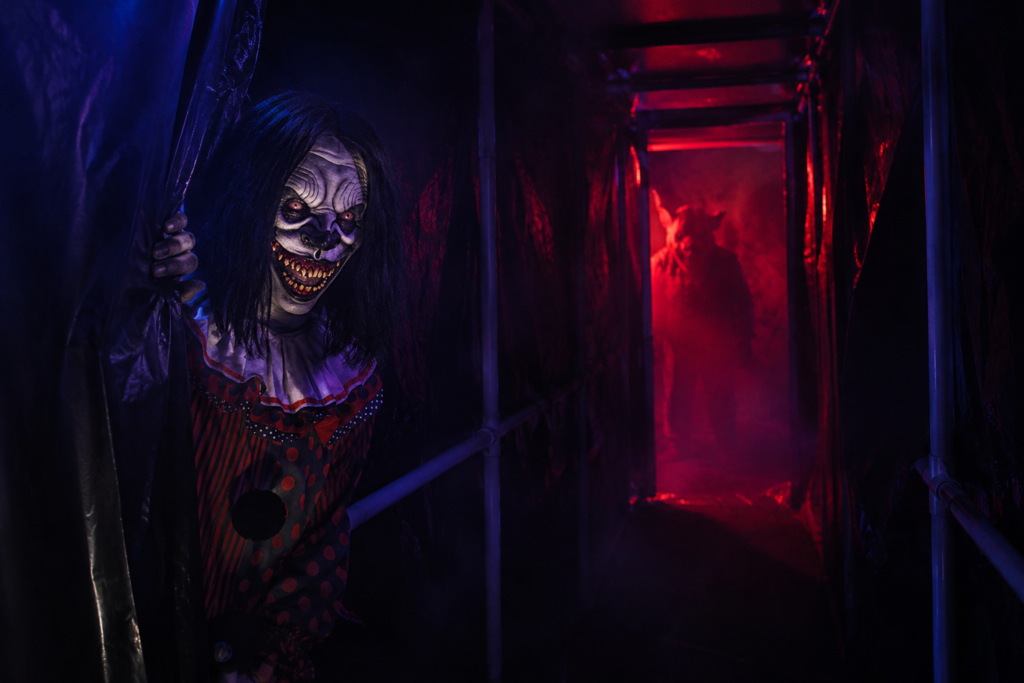
Backlighting — light behind a figure, throwing it into silhouette. A shape with no visible face is far scarier than a fully lit monster. Use backlight at the end of a corridor so guests see a looming silhouette before anything else.
Side lighting — light raking across from one side, carving deep shadows into the texture. Great for emphasizing the sculpt of a mask, the folds of a corpse, or rough wall texture.
Top-down/overhead — the most “normal” angle, so use it sparingly. A single overhead light pool on the floor can isolate a prop like a stage spotlight.
Avoid flat, front-on lighting. It’s how you light a product photo, not a nightmare.
Building a scene with color and contrast
Strong haunt lighting usually comes down to one dominant color plus contrast. A few reliable recipes:
- Blue base + a hit of red: A cold blue corridor with a single red glow around the next doorway pulls guests toward danger.
- Green wash + deep shadow: A sickly green lab where the corners disappear into black.
- Amber flicker + darkness: Firelight dancing on one wall while the rest of the room stays pitch dark.
- Purple + backlit silhouette: A witch scene where the figure is a dark shape against an otherworldly purple haze.
The trick is restraint. One or two colors per scene keeps it readable. Mixing red, green, blue, and purple in one room muddies into a confusing brown-gray wash that reads as “Christmas gone wrong,” not horror.
Practical gear for colored light
You don’t need a professional rig. Common haunt lighting options:
- Color LED par cans / wash lights — the haunter staple. Cheap, cool-running, and many let you dial in any color and set them to flicker or pulse.
- Colored LED flood bulbs — drop them into clamp lights or fixtures for quick uplights and washes.
- Smart bulbs — handy for setting exact colors and scheduling, though usually less punchy than dedicated fixtures.
- Battery LED pucks and strips — perfect for hiding inside props, under tombstones, or in spots with no outlet.
- Color gels over white lights — the old-school option: sheets of colored film clipped over a fixture.
- UV / blacklight — a category of its own. Makes fluorescent paint, certain fabrics, and special makeup glow in the dark. Incredible for clown scenes, reactive scenery, and glowing details.
Browse haunted lighting and effects if you want fixtures built specifically for this kind of work.
Common lighting mistakes
A few traps that flatten an otherwise good haunt:
- Too much light. The number one mistake. When in doubt, turn it down.
- White light leaks. A stray work light or a phone screen kills the mood instantly. Hunt these down.
- Even, shadowless lighting. No shadows means no fear. You need contrast.
- Lighting the actor’s hiding spot. If guests can see the scare coming, it isn’t a scare. Keep hiding pockets dark.
- One color everywhere. Variety between scenes keeps the walk-through feeling like a journey, not a single mood on repeat.
Safety notes
Lighting a haunt safely is straightforward if you plan for it:
- Use LED fixtures, which run cool — critical anywhere near plastic sheeting, fabric, or fog.
- Keep cords taped down and out of the path so guests don’t trip in the dark.
- Don’t aim bright lights directly into guests’ eyes — you want to set mood, not blind people or wash out the next scene.
- Leave enough light for safe footing along the path, even when it’s dim. Guests should be scared, not stumbling.
Quick lighting checklist
- [ ] Most of the space kept dark, with light on specific moments
- [ ] One or two colors per scene, chosen for mood
- [ ] Uplighting on faces and props for that wrong-angle creep
- [ ] Backlit silhouettes used at corridor ends
- [ ] Hiding spots kept in shadow
- [ ] All white-light leaks eliminated
- [ ] LED fixtures used near any plastic or fog
- [ ] Cords taped down, path safe to walk
Get the lighting right and everything you’ve already built hits harder — the walls feel deeper, the props feel alive, and the scares land in the dark. The last piece that ties a haunt together is what fills the air between the lights: fog. Layered correctly, low-lying fog catches every colored beam and turns your whole haunt into something you can practically feel.